If you're setting up Digital Voice yourself, we'll send you a text message and an email to confirm it’s ready to go. Follow the instructions below to complete your setup.
If an engineer is setting up the service for you, you just need to be at home when they visit.
Declaration of Conformity documents explain how your device meets Essential Health and Safety requirements. Visit this page and select your device for more details.
We’ll send you a new Smart Hub if you need one for Digital Voice.
Set up a new or replacement hub with your Digital Voice service
If we’ve sent you a new hub with your Digital Voice service, you’ll need to unpair any handsets from your old hub and connect them to the new one. Follow the steps below to get set up.
To unpair handsets from a hub using Smart Hub Manager:
- Open a web browser.
- Connect to your old hub using Wi‑Fi or a cable.
- Go to http://192.168.1.254/PhoneScreen/phone-manager.
- Scroll down the list and find the handset you want to unpair.
- Select Deregister.
To pair your handset with your new hub:
- Plug the handset into a power socket.
- Find the WPS button on your hub. It has two curved arrows on it.
- Press and hold the WPS button for 2 seconds.
- Press OK on the handset to connect them.
You can follow the same steps to unpair or pair any Digital Voice Adapters you’re using.
Set up your Digital Voice service
Using your Digital Voice handset
Once your Smart Hub has a steady blue light:
- Power up - unpack your Digital Voice handset and connect the power cable to the back of the charger base. Plug the other end into the wall and switch on.
- Activate the batteries - pull the plastic tab away from the handset.
- Link the handset: press OK on your phone, then follow the on-screen steps. When asked, press and hold the WPS button on your Hub for two seconds - it's halfway up on the left-hand side. The WPS button will flash while the phone and Hub are linking, and the phone will show it's registering.
- Software downloads - once your phone is registered, it might have to download a software update. Let it do that, and then continue with the setup.
- Add some contacts - when asked, press Yes to add some contacts and follow the on-screen steps. Or to skip and do it later, press No.
- All done - you can now set up any extra Digital Home Phone handsets (up to five) by following steps 1 to 3.
- Charge up - now that you've set up your phone, it's a good idea to let it charge fully. Just put it on the charger base for up to 16 hours.
Using your own handset?
Please note: If you're using your own phone handset, phones bought before 2015 may not ring while connected to your Digital Voice Adapter. If you are experiencing this issue, call us from your BT or EE mobile on 150, or 0330 123 1105 from any other phone, and we'll supply a free microfilter that will enable your phone to ring.
Using a wired handset
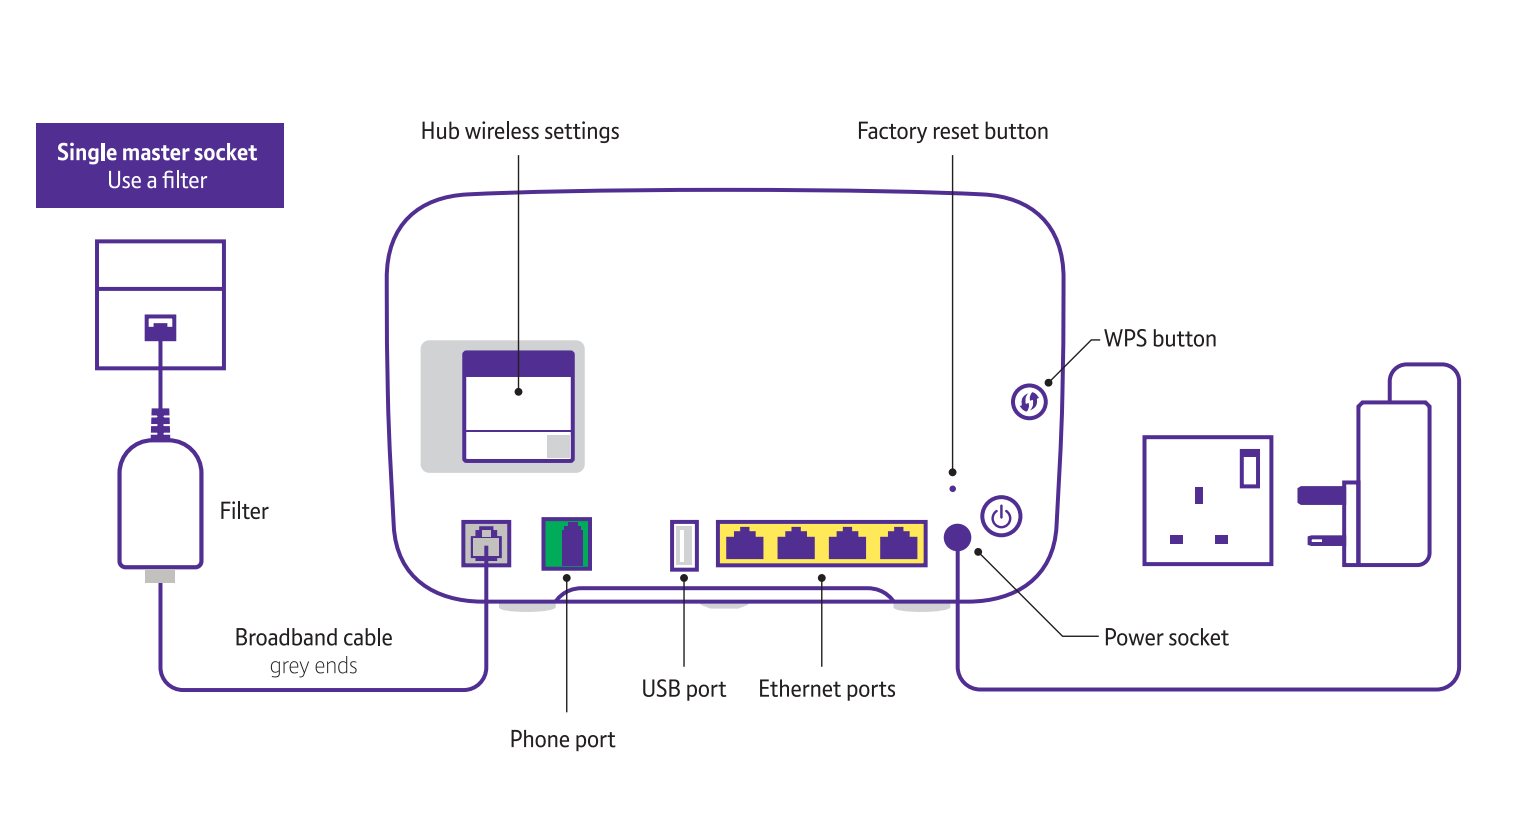
Plug the handset's phone cable directly into the green phone port on the back of the hub.
Using a wired handset away from your hub
Use a Digital Voice Adapter to:
- Set up your handset away from the hub.
- Use additional handsets with a cord.
- Use your wireless handset base unit away from the hub.
We'll send you a Digital Voice adapter. It connects wirelessly to your hub and works like an extension socket.
Find out how to set up a Digital Voice Adapter.
Once set up, your adapter can be unplugged from the mains and set up where you want your phone.
Using a wireless handset with a base unit
If you have a wireless handset with one main base unit and additional handsets, plug the main base unit’s phone cable into the phone port on the back of the hub. Also, ensure you plug the base unit into your mains socket for power.
The other wireless handsets will work as usual.
You can also use a Digital Voice Adapter to wirelessly connect the main base unit to your hub.
Download the user guides for your Digital Voice phone:
![]() Essential Digital Home Phone - user guide (PDF)
Essential Digital Home Phone - user guide (PDF)
How soon can I make and receive calls?
Once you’ve got a steady blue light on your hub and you’ve set up your handset as explained above, you can start using your Digital Voice service. If you have a brand‑new number, you can also receive incoming calls straight away.
If we’re moving your existing phone number to your new service, you should start receiving inbound calls on your Digital Voice Home Phone within 15 minutes.
Once you know inbound calls to your number are being routed correctly, you can unplug any existing handsets from your old service, as they’ll no longer work.
Remember, you can connect a phone directly to the phone port on the back of the hub if you prefer.
Please note: in rare cases where your number was originally allocated by another company, your Digital Voice service may be delayed until 08:00 on the working day after you set up your Smart Hub. Your old service will continue to work in the meantime.